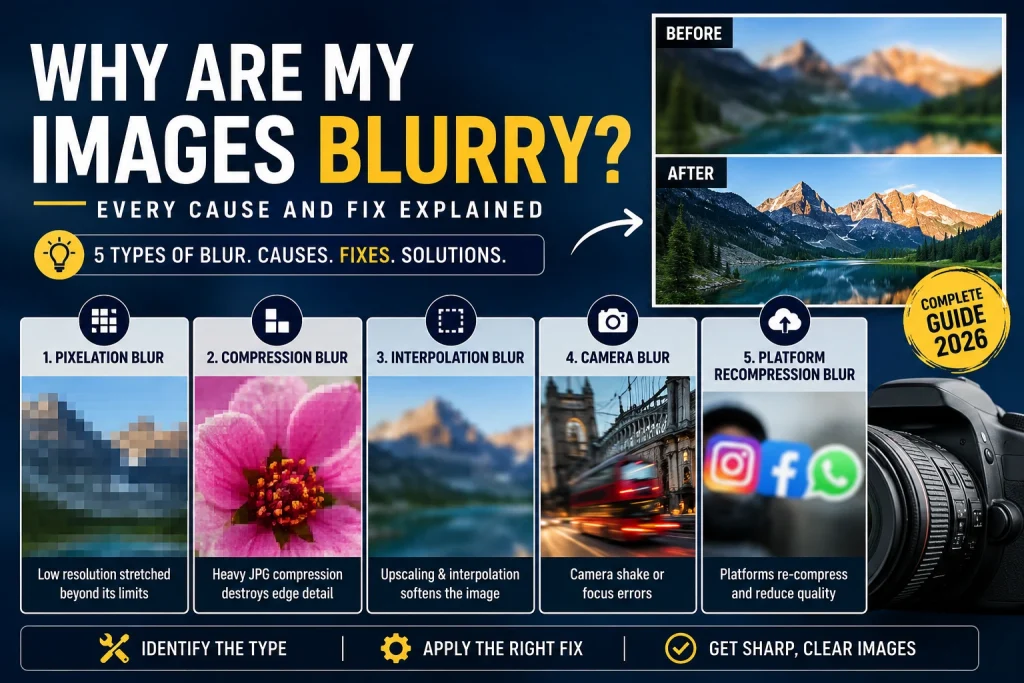
There are five unique causes of blurry images – insufficient resolution that is pushed beyond capacity, pixel size not big enough for the screen resolution, excessive compression of JPG files that ruins edges, camera shake or focus problem while taking a photo, and recompression of the image after uploading it to a platform. Each one appears differently and there are different solutions to them. By recognizing the cause of blurriness of an image, one will know the exact way to fix it or even the impossibility of doing that.
The following guide describes all causes of blurriness of images in 2026 – along with the explanation of the technical reason behind each one, description of appearance of each type of blur, solutions for websites, social networks, printing and presentation, and real information on possibility to restore the image.
The Five Types of Image Blur — Why They Look Different
Not all blurry images are blurry for the same reason. Before trying to fix a blurry image, identifying which type of blur you’re dealing with saves significant time and prevents applying the wrong fix.
Type 1 — Pixelation Blur (Resolution Blur)
Pixelation looks like rectangular blocks or a mosaic effect. The image doesn’t look smoothly blurry — it looks digitally degraded with visible square pixel blocks. You can often see the individual pixel squares, especially in areas that should have smooth gradients or sharp edges.
What causes it: The image has been scaled up significantly beyond its original pixel dimensions. A 400 × 300 pixel image displayed at 1600 × 1200 pixels has each original pixel covering a 4 × 4 block of display pixels — making the individual squares visible.
Where you see it: Low-resolution images used at large sizes, thumbnails used as full-size images, old photos printed large, website images with wrong dimensions.
Type 2 — Compression Blur (Artefact Blur)
Compressed images have patches of wrong color in the plain areas, smudging of edges near sharp boundaries and text, as well as colored halos around the highly contrasted edges. Compression artifacts differ from pixelation in the fact that the image does not consist of squared pixel blocks but bigger ones, measuring about 8 × 8 pixels.
What causes it: Heavy lossy compression — particularly JPG at low quality settings — removes high-frequency detail (fine texture and sharp edges) and creates quantization artefacts in the 8 × 8 processing blocks.
Where you see it: Heavily compressed JPG images, images that have been re-saved as JPG multiple times, images downloaded from websites at low quality, screenshots saved as JPG instead of PNG.
Type 3 — Interpolation Blur (Upscaling Blur)
Interpolation blur looks smooth rather than blocky — the image looks like it’s been run through a soft-focus filter. Edges are present but softened. Colours blend into each other without the sharp transitions of the original. Unlike pixelation, you don’t see discrete squares — everything just looks slightly out of focus.
What causes it: Bilinear or bicubic interpolation when scaling an image up. These algorithms predict what intermediate pixel values should be by averaging surrounding pixels — producing smooth but soft results rather than sharp ones.
Where you see it: Images resized up using basic software, thumbnails enlarged in web browsers when no correctly sized image is available, images imported into presentations at larger sizes than their original dimensions.
Type 4 — Camera Blur (Motion or Focus Blur)
Camera blur looks like actual photographic blur — a directional smear (motion blur from camera shake or subject movement) or a soft out-of-focus look (depth of field or autofocus error). Unlike digital compression or resolution issues, camera blur has smooth, organic-looking softness that follows photographic principles.
What causes it: Camera shake during exposure, subject movement during exposure (too slow shutter speed), autofocus selecting the wrong distance, shooting in low light with too wide an aperture, optical aberrations in the lens.
Where you see it: Photographs taken in low light without stabilisation, sports or action photography at slow shutter speeds, macro photography with shallow depth of field, photos taken quickly on a moving vehicle.
Type 5 — Platform Recompression Blur
Platform recompression blur looks like compression blur but appears specifically on images that looked sharp before uploading. Instagram, Facebook, Twitter, WhatsApp, and almost every social media platform recompresses uploaded images using their own algorithms. The result degrades quality, softens edges, and introduces compression artefacts — especially when the image is uploaded at the wrong dimensions.
What causes it: Uploading images at incorrect dimensions forces the platform to resize before or during recompression. The combined resize and recompress operation degrades quality more than either step alone. Uploading heavily pre-compressed images gives the platform’s algorithm worse source material to work with.
Where you see it: Instagram posts that look sharp on your phone but blurry after posting, Facebook photos that lose quality after upload, WhatsApp images that arrive blurry to recipients.
Why Are My Website Images Blurry?
Website image blurriness is one of the most common problems website owners encounter. It almost always has one of four causes — and all four are fixable.
Cause 1 — Images Uploaded at Wrong Dimensions
An image uploaded in a website space with a size of 400 x 300 pixels will have to be scaled up by 2 times when the display is 800 x 600 pixels. The output produced will be blurry because the browser created extra pixels which were not present in the first place.
How to identify this cause: Right-click the blurry image on your website and select Inspect Element. In the browser developer tools, look for two sets of dimensions — the intrinsic size (the actual file dimensions) and the rendered size (how large it displays). If the rendered size is significantly larger than the intrinsic size, the image is being scaled up and that’s causing the blur.
The fix: Upload the image at the correct dimensions for its display context. Our free Image Resizer lets you set exact pixel dimensions — enter the rendered size you found in the developer tools and resize your image to match before re-uploading.
Common website image dimensions:
- Full-width hero image: 1920 × 1080px
- Blog featured image: 1200 × 628px
- Product image: 800 × 800px
- Inline blog image: 800 to 1200px wide
- Thumbnail: 400 × 300px
Cause 2 — Retina Screen Blurriness
Pictures that appear crisp on an ordinary 96 DPI screen can appear blurry on retina (or high DPI) displays such as the Macbook retina display, iPhone display, iPad display, and even many modern Windows laptops, which have PPI ranging from 200 to 460. These monitors use 2 or 3 actual pixels for each CSS pixel – meaning that a picture that measures 400 pixels wide on CSS is rendered as 800 to 1200 pixels physically when viewed on a retina display.
How to identify this cause: The image looks sharp on your desktop monitor but blurry on a MacBook, iPhone, or high-DPI Windows laptop. This is the classic sign of retina blurriness.
The fix: Upload images at 2× the display dimensions for any image that will appear on retina screens. A product image that displays at 800 × 800px should be uploaded at 1600 × 1600px. Combine with WebP compression to keep file sizes manageable at the doubled dimensions.
According to Apple’s Human Interface Guidelines, images should be provided at 1×, 2×, and 3× resolutions to support all display densities. For websites, the HTML srcset attribute allows serving different resolution versions to different screens automatically.
Cause 3 — Heavy JPG Compression
Website images that were saved at low JPG quality settings show compression artefacts — blocky patches in flat colour areas and soft, smeared edges around sharp lines and text. This is particularly noticeable on text overlays, logo edges, and areas with fine detail.
How to identify this cause: The blurriness is concentrated around edges and in areas of subtle colour variation. You can see distinct block-like patterns in what should be smooth colour gradients. Text that should be sharp has coloured fringing around each character.
The fix: Re-export the image from the original source at a higher quality setting. Use 80 to 85 percent JPG quality for most web images — visually identical to the original at these settings. Better yet, convert to WebP using our JPG to WebP converter — WebP achieves 25 to 34 percent smaller files than JPG at equivalent quality, which means you can use higher quality settings while keeping file sizes competitive.
Our full guide on how to compress an image covers quality settings and their visual impact in detail.
Cause 4 — WordPress Automatic Compression
WordPress automatically compresses uploaded JPG images to 82 percent quality by default (changed from 90 percent in WordPress 4.5). For most images this is acceptable — but for images where sharpness is critical, it can cause noticeable softening especially on compressed images that are then re-compressed.
How to identify this cause: Images look slightly soft after uploading to WordPress even though they look sharp on your computer before uploading.
The fix — Option 1: Add this line to your wp-config.php file to disable WordPress’s automatic compression:
php
add_filter('jpeg_quality', function($arg){ return 100; });The fix — Option 2: Upload WebP images instead of JPG. WordPress 5.8+ accepts WebP uploads directly and doesn’t apply the same automatic compression to WebP files that it applies to JPG.
Our article on WebP images for WordPress covers the full WordPress image optimisation workflow including how to serve sharp images at optimal file sizes.
Why Are My Images Blurry on Instagram?
Instagram blurriness is one of the most searched image quality problems — and it has specific, well-documented causes.
Cause 1 — Wrong Dimensions
Instagram recompresses all uploaded images. When you upload at incorrect dimensions, Instagram resizes the image first, then recompresses it. The combined resize-then-compress process degrades quality more than either step alone.
Instagram’s required dimensions in 2026:
| Post Type | Required Dimensions | Aspect Ratio |
|---|---|---|
| Square post | 1080 × 1080px | 1:1 |
| Portrait post | 1080 × 1350px | 4:5 |
| Landscape post | 1080 × 566px | 1.91:1 |
| Stories | 1080 × 1920px | 9:16 |
| Reels | 1080 × 1920px | 9:16 |
Uploading at exactly these dimensions gives Instagram’s algorithm a properly sized image — it only needs to compress, not resize-then-compress. The quality improvement is noticeable.
Cause 2 — Instagram’s Data Saver Mode
Instagram has a Data Saver mode that serves lower-quality images to users on mobile data connections to reduce bandwidth. If your Instagram images look blurry on your phone but sharp on desktop, Data Saver may be active.
Fix: In the Instagram app, go to Settings > Account > Cellular Data Use and disable Use Less Data.
Cause 3 — Uploading as PNG Instead of JPG
This may seem paradoxical since PNG has higher quality compared to JPG. However, when uploading pictures to Instagram, the algorithm of Instagram works better with JPG files. In case of PNG, Instagram converts PNG to JPG while uploading the file – this conversion is made through the algorithm of Instagram itself and at its own quality level.
Fix: Upload photographs as JPG at 80 to 90 percent quality. Upload graphics and text-heavy images as PNG — Instagram handles these better in PNG format.
Cause 4 — Uploading From Low-Quality Screenshot
Screenshots taken on an Android phone at low screen resolution, or screenshots taken with a 3× scale factor on some devices, can create differently-dimensioned images than expected.
Fix: Edit and export images from the original source rather than screenshotting. Our Image Resizer handles exact dimension targeting for every Instagram post type.
Why Are My Images Blurry When Printed?
Print blurriness is almost always a resolution problem — the image doesn’t have enough pixels for the print size at 300 DPI.
The Print Resolution Formula
Required pixels = Print size in inches × 300 DPI
Examples:
- 4 × 6 inch print: needs 1200 × 1800px minimum
- 5 × 7 inch print: needs 1500 × 2100px minimum
- 8 × 10 inch print: needs 2400 × 3000px minimum
- 11 × 14 inch print: needs 3300 × 4200px minimum
- 16 × 20 inch print: needs 4800 × 6000px minimum
If your image doesn’t have enough pixels for the required print size, the print will be blurry — no amount of software processing can create the missing pixel detail.
Common Print Blur Situations
Blurry photos from old phones: Smartphone cameras from 2012 to 2015 produced 8 to 12 megapixel images — adequate for prints up to 8 × 10 inches at 300 DPI but not enough for large canvas prints or poster-sized output.
Blurry images downloaded from the web: Web images are typically saved at 72 to 96 PPI for screen display — far below the 300 DPI needed for print. A 1920 × 1080 web image prints sharply at only 6.4 × 3.6 inches at 300 DPI. Try to print it at 20 × 11 inches and it will look pixelated.
Blurry screenshots printed large: Screenshots contain only enough pixels for the screen resolution — typically 1920 × 1080 or similar. Printing these at A4 size or larger almost always produces visible pixelation.
How to Fix Blurry Print Images
Option 1 — Source a higher-resolution version: If the image exists at higher resolution elsewhere — on the original camera, from the original photographer, or in a stock photo library — download the highest available resolution version.
Option 2 — Reduce the print size: Print the image at a size where the existing pixel count is sufficient for 300 DPI. Use the formula — pixels ÷ 300 = maximum sharp print size in inches.
Option 3 — AI upscaling: AI upscaling tools use machine learning to increase pixel count by predicting what additional detail should look like. Tools like Topaz Gigapixel AI, Adobe Photoshop’s Super Resolution, and various online AI upscalers can increase image size by 2× to 4× with results significantly better than traditional interpolation. At 2× upscaling, the results are often impressive — at 4×, quality varies considerably by image type.
What AI upscaling cannot do: It cannot recover detail that was never captured. If a photo was taken out of focus, AI upscaling makes it a larger blurry image. If a web thumbnail was originally compressed heavily, AI upscaling improves the smooth blurriness but can’t reconstruct genuinely fine detail.
Why Are My Images Blurry in PowerPoint or Google Slides?
Presentations are a surprisingly common source of image blurriness — and the causes are different from web or print blurriness.
Cause 1 — PowerPoint Automatic Compression
PowerPoint automatically compresses inserted images when you save a presentation. By default, it reduces images to 220 PPI (suitable for print but not for high-resolution screen display). On 4K presentation screens, this can look noticeably soft.
Fix in PowerPoint:
- Go to File > Options > Advanced
- Scroll to the Image Size and Quality section
- Check Do not compress images in file
- Select your target resolution — 330 PPI for HD screens or 220 PPI for standard screens
Or disable compression for a specific save:
- Go to File > Save As
- Click Tools > Compress Pictures in the save dialog
- Uncheck Apply basic compression on save
Cause 2 — Wrong Image Dimensions for Slide Size
Standard PowerPoint presentations are 1920 × 1080 pixels (16:9 widescreen). If you’re using images smaller than this for full-slide images, they’ll be scaled up and look blurry.
Fix: Use images at 1920 × 1080px or larger for full-slide images. For images used at smaller sizes within a slide, match the image dimensions to the size it appears at in the presentation.
Cause 3 — Inserting Images From URLs
Some users insert images by linking to URLs rather than embedding the actual image file. When the presentation is viewed without internet access, PowerPoint may display a low-resolution cached version or a placeholder.
Fix: Always download and embed image files directly rather than inserting from URLs
Why Are My Images Blurry When I Zoom In?
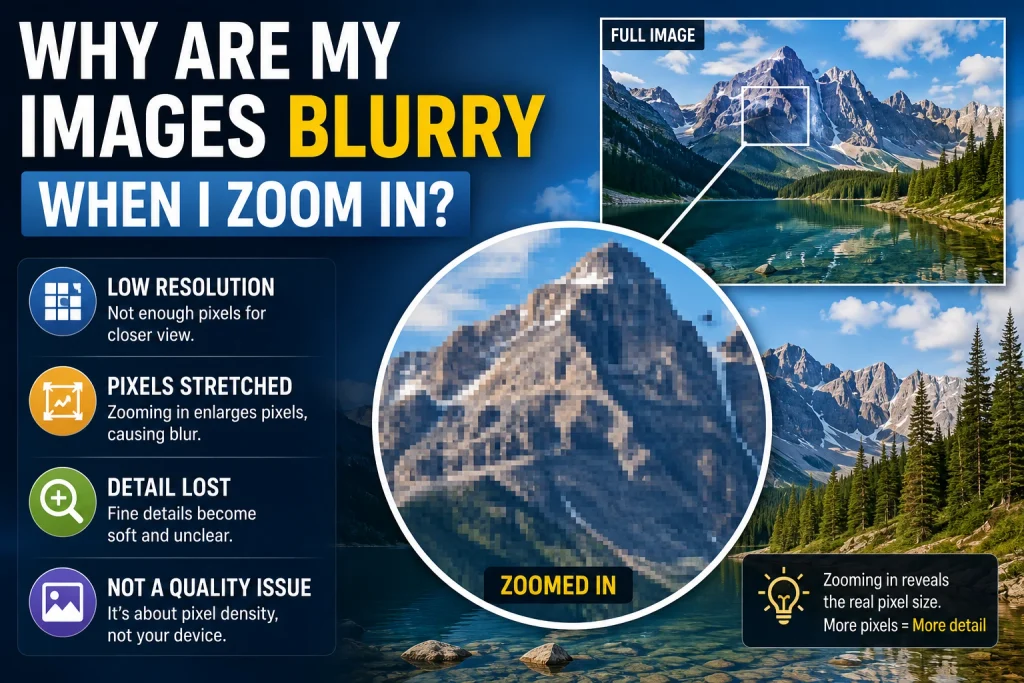
Images that appear crisp at the standard viewing scale and then become fuzzy when viewed at a larger scale are always constrained by resolution; they contain sufficient pixels to make them appear sharp at the standard viewing scale but insufficient at the larger one.
This is perfectly normal behavior for raster images (JPG, PNG, WebP). All raster images are made up of a fixed number of pixels. View them beyond 100 percent scale and your screen is being asked to show details that aren’t contained in the image anymore.
When Zoom Blurriness Is a Problem
eCommerce product images with zoom functionality: Online stores that let customers zoom into product images need much higher-resolution source images than those used for display. An 800 × 800px product image displayed at 400 × 400px looks sharp — but zooming 2× reveals the 800px limit. For zoom functionality, upload products at 2000 × 2000px or higher.
Medical and scientific images: In contexts where close examination of image detail matters — medical imaging, microscopy, satellite imagery — image resolution is critical and zoom blurriness has real consequences.
The Fix for Zoom Blurriness
For images that need to support zoom, always upload at higher resolution than the display size:
- eCommerce products with 2× zoom: upload at 2× the display dimensions
- Products with 4× zoom: upload at 4× the display dimensions
- For maximum zoom quality: upload the highest resolution version available
Why Are My Images Blurry After Resizing?
Resizing images up (increasing dimensions) always causes some blurriness through interpolation. Resizing images down (decreasing dimensions) generally preserves quality — but the algorithm used for downscaling affects sharpness.
Blurry After Upscaling — What’s Happening
Images that appear crisp at the standard viewing scale and then become fuzzy when viewed at a larger scale are always constrained by resolution; they contain sufficient pixels to make them appear sharp at the standard viewing scale but insufficient at the larger one.
This is perfectly normal behavior for raster images (JPG, PNG, WebP). All raster images are made up of a fixed number of pixels. View them beyond 100 percent scale and your screen is being asked to show details that aren’t contained in the image anymore.
Fix: Never upscale raster images beyond 110 to 120 percent of the original dimensions using basic interpolation — quality degradation becomes visible above this threshold. For significant upscaling, use AI upscaling tools. For fundamental resolution needs (like a logo that must scale to any size), use SVG — the vector format that never blurs at any size. Our guide on how to convert JPG to SVG covers converting raster images to scalable vector format.
Blurry After Downscaling — What’s Happening
Downscaling rarely causes blurriness if done correctly. But some tools apply smoothing during downscaling that softens fine details. Images with high-frequency detail (text, fine textures, sharp patterns) are most affected.
Fix: Use bicubic sharper or Lanczos resampling in Photoshop for downscaled images with fine detail. Add a small amount of unsharp mask after downscaling — this sharpens edge detail softened during the scaling process.
Why Are My Images Blurry on iPhone or Android
Low-Resolution Downloaded Images
Images downloaded from websites, messaging apps, and social media are often served at reduced resolution for bandwidth efficiency. A photo shared via WhatsApp is compressed by WhatsApp’s algorithm — the recipient gets a lower-quality version than the original.
Fix: For important images, request the original file from the sender rather than downloading the shared version. Use AirDrop (iPhone to iPhone/Mac) or Bluetooth file transfer (Android) to transfer images without any recompression.
WhatsApp Image Compression
WhatsApp compresses all shared images, regardless of the sender’s settings, to reduce bandwidth consumption. The compression is significant — a 5MB photo might arrive at 200 to 500KB after WhatsApp processing.
Fix for better WhatsApp image quality: Send images as documents rather than photos. In WhatsApp, tap the attachment icon, select Document, and select your image file. WhatsApp doesn’t apply the same aggressive compression to files sent as documents — the recipient gets a much higher quality version.
Camera App Settings
Some Android camera apps default to medium resolution settings rather than maximum. Check your camera app’s settings and ensure it’s capturing at the highest available resolution.
For iPhones, the camera captures at full resolution by default. HEIC format (iPhone’s default) produces sharp images at smaller file sizes than JPG. If converted HEIC files look blurry, check that the conversion was done at high quality settings. Our guide on how to convert HEIC to JPG covers quality-preserving HEIC to JPG conversion.
Can Blurry Images Be Fixed? — Honest Assessment
This is the question most people really want answered. The honest answer depends entirely on the type of blur.
What Can Be Fixed
| Blur Type | Fixable? | Method |
|---|---|---|
| Wrong display dimensions (pixelation) | ✅ Yes | Re-upload at correct dimensions |
| Platform recompression | ✅ Yes | Upload at correct dimensions/format |
| WordPress auto-compression | ✅ Yes | Disable WP compression or use WebP |
| PowerPoint compression | ✅ Yes | Disable image compression in settings |
| Compression artefacts (mild) | ⚠️ Partially | Sharpen filter, re-export at higher quality |
| Retina blurriness | ✅ Yes | Upload 2× resolution images |
| Upscaling blur (mild) | ⚠️ Partially | AI upscaling tools |
What Cannot Be Fixed
| Blur Type | Fixable? | Reason |
|---|---|---|
| Camera shake/motion blur | ❌ No | Missing pixel data — never captured |
| Focus error | ❌ No | Out-of-focus detail cannot be recovered |
| Heavy compression on lost original | ❌ No | Original data permanently removed |
| Fundamental resolution limit | ❌ No | Can’t add detail never captured |
| Severe upscaling blur | ❌ No | Too far from original to recover |
The fundamental rule: If the blur is caused by missing pixel data — either from insufficient resolution, camera errors, or permanently discarded compression data — no software can truly fix it. AI upscaling and deblurring tools can make blurry images look somewhat better, but they’re making educated guesses about what the missing data should look like. They cannot genuinely recover what was never captured.
How to Prevent Images From Being Blurry
For Websites
- Always upload images at the correct display dimensions — check with browser inspector if unsure
- Upload at 2× dimensions for retina screen sharpness
- Use WebP format — better quality at smaller file sizes than JPG
- Set image compression quality to 80 to 85 percent minimum
- Disable WordPress’s automatic JPG compression
- Run images through our Image Compressor before uploading — smart compression preserves edge quality better than basic tools
For Social Media
- Upload at the platform’s exact recommended dimensions
- Use JPG at 80 to 90 percent quality for photographs
- Use PNG for graphics with text or sharp edges
- Disable Data Saver mode in Instagram and other apps
- Don’t pre-compress images heavily before uploading — let the platform compress from a high-quality source
For Print
- Always check pixel dimensions against the print size formula before ordering
- Shoot at the highest available camera resolution for images intended for large prints
- Source stock photos at the highest available resolution for commercial print use
- Never use web-resolution images for print without checking the DPI is sufficient
For Photography
- Use faster shutter speeds in low light — 1/focal length minimum to prevent camera shake
- Enable optical image stabilisation if available
- Use autofocus confirmation before capturing critical shots
- Use a tripod for low-light, long-exposure, or macro photography where shake is a factor
Tools for Checking and Fixing Image Sharpness
Google PageSpeed Insights
Go to pagespeed.web.dev and run a test on your website. It identifies images that are displayed at larger dimensions than their file dimensions — the most common cause of web image blurriness. Each flagged image tells you the actual dimensions and the display dimensions so you know exactly what needs to be corrected.
Browser Developer Tools
In Chrome or Firefox, press F12 to open developer tools. Click on any blurry image on a web page. The Elements panel shows the image tag with both intrinsic and rendered dimensions. If the rendered dimensions are larger than the intrinsic dimensions, the image is being scaled up and will look blurry.
Our Free Image Resizer
For fixing dimension-based blurriness, our free Image Resizer lets you enter exact pixel dimensions and download a correctly-sized image. Enter the correct display dimensions found in the browser developer tools and re-upload the properly sized image to fix web blurriness immediately.
Frequently Asked Questions
1. Why do my images look blurry on my website?
The main cause for such problem is that one is loading pictures in smaller pixel sizes as compared to the screen size and this leads to scaling of the picture causing interpolation blurring. The solution to the above problem is using the developer tools of the browser to verify if the size of the picture is smaller than the size it is displayed on and upload images in the right pixel sizes depending on the display screen size.
2. Why are my Instagram images blurry after posting?
Instagram recompresses all uploaded images. Uploading at incorrect dimensions forces Instagram to resize before compressing — the combined process degrades quality more. Upload at exact Instagram dimensions: 1080 × 1080px for square, 1080 × 1350px for portrait, 1080 × 1920px for Stories. Use JPG at 80 to 90 percent quality for photographs. Check Data Saver isn’t enabled in Instagram settings.
3. Can you fix a blurry photo?
Depends on the cause. Blurriness from wrong display dimensions — fixable by using the correct image size. Platform recompression blur — fixable by uploading at correct dimensions and format. Camera shake or focus blur from the original capture — not fixable. The missing detail was never captured. AI deblurring tools can improve the appearance of mild blur but cannot genuinely recover detail that was never there.
4. Why do my images look blurry when printed?
Your image doesn’t have enough pixels for the print size at 300 DPI. Calculate required pixels using: print size in inches × 300 = minimum pixels needed. A 5 × 7 inch print needs at least 1500 × 2100 pixels. If your image is smaller, either reduce the print size or source a higher-resolution version.
5. Why do my images look blurry on retina screens?
Retina screens use 2 physical pixels for every CSS pixel — a 400px wide image on a retina display is rendered using 800 physical pixels. If the image is only 400 pixels wide, each original pixel covers 4 physical pixels and looks blurry. Fix by uploading images at 2× the display dimensions.
6. Why are my WhatsApp images blurry?
WhatsApp compresses all shared images significantly. To get better image quality through WhatsApp, send images as documents rather than photos — tap the attachment icon, select Document, and choose your image file. WhatsApp applies much less compression to files sent as documents.
7. Does converting JPG to PNG fix blurriness?
No. Converting JPG to PNG creates a lossless copy of the JPG — preserving the quality exactly as it is, including any existing blurriness or compression artefacts. PNG can’t recover detail that JPG compression already removed. The fix for JPG compression blur is to re-export from the original lossless source at higher quality settings.
8. Why are my images blurry in PowerPoint?
PowerPoint automatically compresses images when you save a presentation. Disable this by going to File > Options > Advanced > Image Size and Quality > Do not compress images in file. Also ensure images are uploaded at 1920 × 1080px or higher for full-slide images — smaller images scaled up in PowerPoint look blurry.
9. How do I sharpen a blurry image?
Sharpening filters in Photoshop (Unsharp Mask, Smart Sharpen) and similar tools enhance the appearance of edges by increasing contrast between adjacent pixels — this makes images look sharper but doesn’t add real detail. For genuine detail recovery, AI upscaling tools perform better. For fundamental blur from insufficient resolution or camera errors, there’s no complete fix — sharpening improves appearance but doesn’t recover missing information.
10. Why do my images look blurry after resizing?
Resizing up (increasing dimensions) causes interpolation blur — software guesses new pixel values based on surrounding pixels, producing smooth but soft results. Resizing down generally preserves quality. For upscaling, use AI upscaling tools which produce sharper results than basic interpolation. For images that need to scale to any size without blurring, convert to SVG vector format using our JPG to SVG converter.
Conclusion
Blurry images can be classified into five categories, each having a unique appearance and a unique solution. Blurring due to low resolution, compression artefacts due to severe JPG compression, upscaling interpolation blur, capture errors on cameras, and platform recompression due to social media algorithms.
It is crucial to know whether the cause of blur is due to a correctible workflow mistake, such as having the wrong dimension, wrong file format, or wrong compression level. These kinds of workflow mistakes can always be corrected. It would not be possible to recover the missing pixel data using any existing technology.
Websites: upload images at their display dimension, using WebP file format and disabling WordPress auto-compression. Social media: upload images in platform-specific dimensions, using JPG file type for photos. Printing: ensure that the image pixels conform to the 300 DPI equation. Camera blur: correct the blur at the capture phase and not recovery phase.
Use our free Image Resizer to fix dimension-based blurriness and our Image Compressor to optimise compression quality — no sign-up, no watermarks, batch processing supported, completely free on any device.