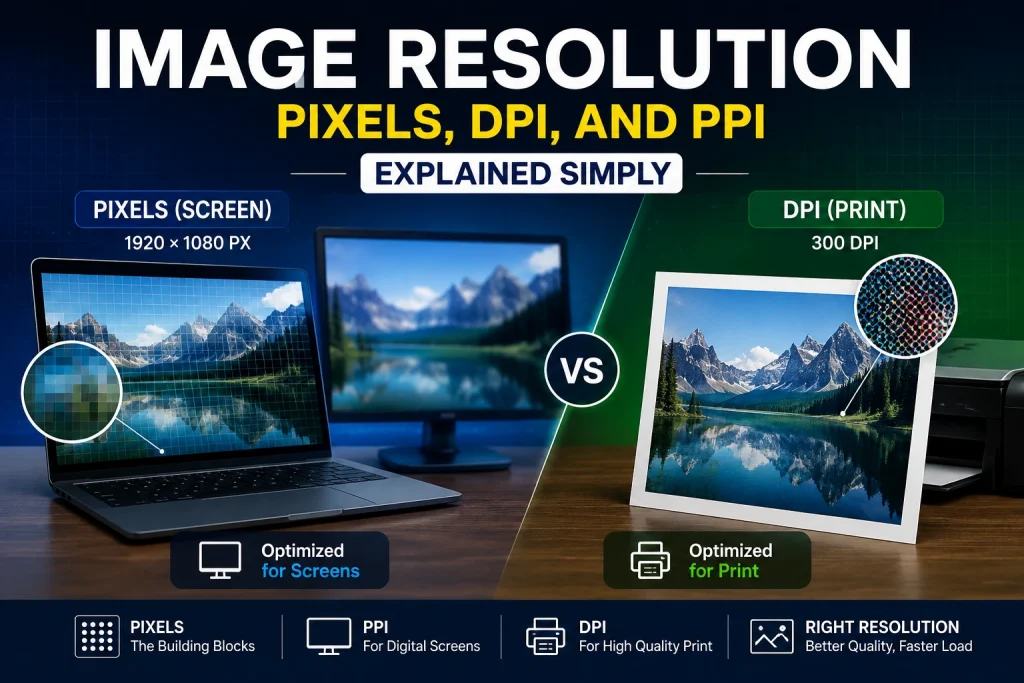
Image resolution is the term used to define how many details exist in an image, measured in pixel dimensions for screens and in DPI or PPI for printing purposes. An image that is 4000 by 3000 pixels holds 12 million pixels of detail. Print the image at 300 DPI and it becomes a sharp 13 inches x 10 inches print. Show it on a 1920×1080 screen and 99% of those pixels are wasted. Image resolution requires that you understand how many pixels you need and for what purpose and at what dimensions, and the mistakes made in determining that is why images become blurry, pixelated and oversized.
This guide will explain all there is to know about image resolution including its meaning for both screens and print, the differences between pixels, DPI and PPI, how resolution influences file size and load time, what resolution is needed in each case and how to fix common resolution issues.
What Is Image Resolution? — Definition and Core Concept
Image resolution refers to the level of details an image can contain or capture. Higher resolution means higher levels of detail, higher quality, and larger files. On the other hand, lower resolution means lower levels of detail and may result in blurry images and smaller files.
Resolution doesn’t always mean the same thing; its definition depends on the situation. In screen displays and the internet, resolution refers to the pixel dimensions, which refer to the width and height in pixels of the image. When it comes to printing, it refers to pixel density.
Why resolution matters: Resolution determines the maximum size at which an image looks sharp. Every image has a fixed amount of pixel information. Displayed too large, that information gets stretched — each pixel covers more physical space and the image looks blurry. Displayed at the right size or smaller, every pixel represents a precise point of colour and the image looks sharp.
The key insight: Resolution is not about quality in the abstract — it is about the relationship between the pixel count of an image and the size at which it is displayed or printed. The same image can look perfectly sharp on a phone screen and completely pixelated on a large monitor. Resolution is always relative to output size.
Pixels — The Foundation of Digital Images
What Is a Pixel?
A pixel, which stands for “picture element,” is the smallest component in a digital image. In any digital image, all the pixels consist of just one color value each. Each pixel in a digital image looks like a square of colored light on the computer display. At a typical viewing distance, all these millions of squares blend to form an image.
The term “pixel” was first coined in 1965 by Fredric Billingsley, an engineer at NASA, to refer to picture elements in the images from space probes.
How pixels work: Each pixel stores colour information as three values — red, green, and blue — each ranging from 0 to 255 in standard 8-bit colour. This gives 16.7 million possible colours per pixel. A 1920 × 1080 image contains exactly 2,073,600 pixels — each one storing its own set of RGB values — which together create the complete image.
Pixel dimensions — what they tell you: When someone says an image is 1200 × 800 pixels, they mean it is 1200 pixels wide and 800 pixels tall. Multiply those numbers — 1200 × 800 = 960,000 pixels total. That total pixel count is sometimes called megapixels — a 12-megapixel camera captures 12 million pixels per photo.
How Pixel Count Affects Quality
The more the pixels, the better the quality—the only problem is that sometimes the display cannot handle the resolution anyway. An image with a size of 4000 x 3000 (12 megapixels), viewed on a monitor with a resolution of 1920 x 1080, will use only 2.07 megapixels and the remaining pixels will be simply ignored by the software.
However, when printing an image, the difference becomes apparent. While a 4000 x 3000 image prints at 13.3 x 10 inches at 300 DPI (a pretty decent print indeed), an 800 x 600 image prints at 2.7 x 2 inches.
DPI vs PPI — What Is the Difference?
What Is PPI (Pixels Per Inch)?
PPI — Pixels Per Inch — describes how many pixels are packed into each inch of a digital display. It is a screen measurement. A phone screen with 400 PPI packs 400 pixels into every inch of its display — which makes images look extremely sharp and detailed because individual pixels are too small to see with the naked eye.
Why PPI matters for screens: Higher PPI screens display images more sharply. Apple’s Retina displays typically offer 264 to 460 PPI. Standard HD monitors offer around 96 to 110 PPI. The difference is visible — text and images on high-PPI screens look noticeably crisper.
The practical impact: When preparing images for screens, you don’t directly control PPI — that’s determined by the display hardware. What you control is the pixel dimensions of the image. A 1920 × 1080 pixel image fills a 1920 × 1080 screen perfectly regardless of whether that screen is 96 PPI or 400 PPI.
What Is DPI (Dots Per Inch)?
DPI — Dots Per Inch — is a print measurement. It describes how many ink dots a printer places in each inch of the printed output. Higher DPI means more ink dots per inch, which means finer detail and sharper printed output.
Why DPI matters for print: Professional print quality requires 300 DPI. At 300 DPI, individual ink dots are invisible to the naked eye at normal reading distance — the print looks smooth and continuous like a photograph. Below 150 DPI, prints start looking pixelated and rough. At 72 DPI, a printed image looks obviously blocky and poor.
The formula that matters:
Print size (inches) = Pixel dimension ÷ DPI
So a 3000-pixel wide image printed at 300 DPI produces a 10-inch wide print (3000 ÷ 300 = 10). The same image printed at 150 DPI produces a 20-inch wide print — but it will look noticeably less sharp because the pixels are spread more thinly.
DPI vs PPI — The Common Confusion
DPI and PPI are technically different measurements — DPI refers to printer dots, PPI refers to screen pixels. But in everyday use, the terms are often used interchangeably. When a designer says “export at 72 DPI for web” or “save at 300 DPI for print,” they’re technically referring to PPI in the file metadata. Most software — including Photoshop, Lightroom, and Preview — uses DPI in their export dialogs even when they technically mean PPI.
The important thing to understand: DPI only matters for print. For screen use, only pixel dimensions matter.
Screen Resolution vs Print Resolution — Two Different Things
Screen Resolution
For digital screens — websites, social media, apps, presentations — resolution means pixel dimensions. A 1920 × 1080 display shows 1920 pixels horizontally and 1080 pixels vertically. An image displayed on this screen needs 1920 × 1080 pixels to fill it completely at full sharpness.
The DPI metadata in image files does not affect screen display. A 1200 × 800 image looks exactly the same on screen whether its DPI metadata is set to 72, 96, 300, or 600. The screen doesn’t read that metadata for display purposes — it only cares about pixel dimensions. This is one of the most misunderstood facts about digital images.
What “72 DPI for web” actually means: When designers say to export images at 72 DPI for web, they’re following an old convention from the days when standard monitors were 72 PPI. In practice, the 72 DPI setting in the file metadata has zero effect on how the image displays in a browser. What matters is the pixel dimensions — not the DPI value stored in the metadata.
Print Resolution
For print, resolution means pixel density — DPI. The standard for professional print quality is 300 DPI. At 300 DPI, ink dots are small enough to be invisible at normal viewing distance and the print looks photographic in quality.
Minimum DPI requirements by print type:
| Print Type | Minimum DPI | Ideal DPI |
|---|---|---|
| Professional photo print | 300 | 300–600 |
| Magazine and brochure | 300 | 300 |
| Newspaper | 150–200 | 200 |
| Large format banner (viewed close) | 150 | 200 |
| Billboard (viewed from distance) | 25–72 | 72 |
| Canvas print | 150 | 200–300 |
| Business card | 300 | 300–600 |
| Book interior | 300 | 300 |
Why billboards need less DPI: Billboards are viewed from distances of 10 to 100 metres. At that distance, 25 to 72 DPI produces images that look perfectly sharp to the human eye — the viewing distance compensates for the lower pixel density. The same image viewed up close would look pixelated, but nobody views billboards up close.
How to Calculate the Resolution You Need
For Print — The Calculation
To find out if an image has enough resolution for a specific print size at 300 DPI:
Required pixels = Print size in inches × DPI
Examples:
- 4 × 6 inch print at 300 DPI = 1200 × 1800 pixels minimum
- 5 × 7 inch print at 300 DPI = 1500 × 2100 pixels minimum
- 8 × 10 inch print at 300 DPI = 2400 × 3000 pixels minimum
- 11 × 14 inch print at 300 DPI = 3300 × 4200 pixels minimum
- 16 × 20 inch print at 300 DPI = 4800 × 6000 pixels minimum
Quick reference for common print sizes at 300 DPI:
| Print Size | Minimum Pixels Needed |
|---|---|
| 4 × 6 inches | 1200 × 1800 px |
| 5 × 7 inches | 1500 × 2100 px |
| 8 × 10 inches | 2400 × 3000 px |
| 8.5 × 11 inches (A4) | 2550 × 3300 px |
| 11 × 14 inches | 3300 × 4200 px |
| 16 × 20 inches | 4800 × 6000 px |
| 20 × 30 inches | 6000 × 9000 px |
For Screens — The Simpler Calculation
For screen use, match the image pixel dimensions to the display size:
- Full-width website banner: 1920 × 1080 pixels
- Blog featured image: 1200 × 628 pixels
- Product image: 800 × 800 pixels
- Instagram post: 1080 × 1080 pixels
- YouTube thumbnail: 1280 × 720 pixels
For retina and high-DPI screens, use 2× the display dimensions. A button displayed at 200 × 50 pixels should be saved at 400 × 100 pixels for retina sharpness — the browser scales it down to the correct display size but uses the extra pixels to display sharply on high-PPI screens.
Our article on best image size for website covers the correct dimensions for every web use case with a full reference table.
What Is Image Resolution for Different File Formats?
JPG Resolution
JPG images contain resolution information (the DPI number) in the image itself—but as stated previously, this is relevant only for prints. The DPI number in a JPG image lets the printing program know what size to print that image as the default setting. If you increase the DPI number from 72 to 300, it will then be set as the default small size to print, while the pixel information stays the same.
For web use: focus on JPG pixel dimensions, not DPI.
For print use: ensure the pixel dimensions are sufficient for the print size at 300 DPI.
PNG Resolution
DPI metadata information is also available for PNG format images—it is referred to as the pHYs chunk in the specification. Again, the concept is similar: DPI metadata helps to set print size default values but does not affect the appearance of the images on a computer screen.
WebP Resolution
WebP retains all resolution information in the same way that PNGs and JPGs do. However, when using WebP on the Internet—where WebP is intended to be used—the only thing that will matter is pixel size.
SVG Resolution
SVG is a vector format and therefore has no fixed resolution. SVG images are described using mathematical paths rather than pixels — which means they scale to any size at any output resolution without ever losing quality. An SVG logo looks perfectly sharp on a tiny phone screen and on a massive 8K monitor. For logos and icons that need to look sharp at any size, SVG is the only format that eliminates resolution concerns entirely.
Our guide on how to convert JPG to SVG explains how to convert raster images to vector SVG when resolution-independence is needed.
Why Images Look Blurry — Resolution Problems Explained
Cause 1 — Image Scaled Up Beyond Its Pixel Count
This is how images become blurred most of the time. If an image of size 400×300 has to be displayed in a screen resolution of 1200×900, then the software will have to guess three times as many pixels as available. This is done using interpolation; in other words, guessing the color of the pixel based on adjacent pixels.
Example: You download a thumbnail image (300 × 200 pixels) from a website and insert it into a PowerPoint presentation as a full-slide image (1280 × 720 pixels). The software scales it up 3.6× — which creates visible blurring because the original had only a fraction of the pixels needed.
The fix: Always use the highest resolution source image available. Never scale a raster image up significantly — always scale down from a higher-resolution source. According to Adobe’s image resolution documentation, upscaling raster images always results in quality loss because interpolation cannot recover pixel data that was never captured.
Cause 2 — Low-Resolution Image Sent to Print
A 600 × 400 pixel image printed at 8 × 5 inches needs to be printed at 75 DPI to fill that space. At 75 DPI, each ink dot covers a much larger area than at 300 DPI — the result looks obviously pixelated and blocky, especially on close examination.
The fix: Check your pixel dimensions against the required print size using the formula above before sending to print. If the image doesn’t have enough pixels, source a higher-resolution version.
Cause 3 — Incorrect Image Dimensions for Display Context
A 200 × 200 pixel image used in a 600 × 600 pixel image slot on a website causes the browser to scale it up 3×, creating visible blurring. This often happens when website themes expect a specific image size but the uploaded image is too small.
The fix: Match image pixel dimensions to the display dimensions in the website layout. Use our free Image Resizer to resize images to exact pixel dimensions needed for each use case.
Cause 4 — Heavy JPG Compression
Heavy JPG compression doesn’t reduce pixel count — it reduces the quality of the pixel data stored. At very low quality settings (below 60 percent), compression artefacts appear as blurry patches, blocks of incorrect colour, and soft edges around sharp detail. This looks like blurring even though the pixel dimensions haven’t changed.
The fix: Use JPG quality settings between 75 and 90 percent for most uses. Use PNG or WebP lossless for images where edge sharpness is critical. Our guide on how to compress an image covers quality settings and their visual impact in detail.
Cause 5 — Camera Focus Issues vs Resolution Issues
Not all image blurriness is a resolution problem. Camera shake, motion blur, and focus errors create blurry images regardless of resolution. A 24-megapixel blurry photo is still blurry even at high resolution — the blur is in the pixel data itself, not a product of insufficient pixels.
Important distinction: Resolution problems create pixelation and a “blocky” appearance. Camera and focus problems create motion blur and soft edges. These look different and have different fixes — resolution problems are solved by using higher-resolution source images; camera blur issues cannot be fixed after the fact through resolution changes.
Resolution for Social Media Platforms
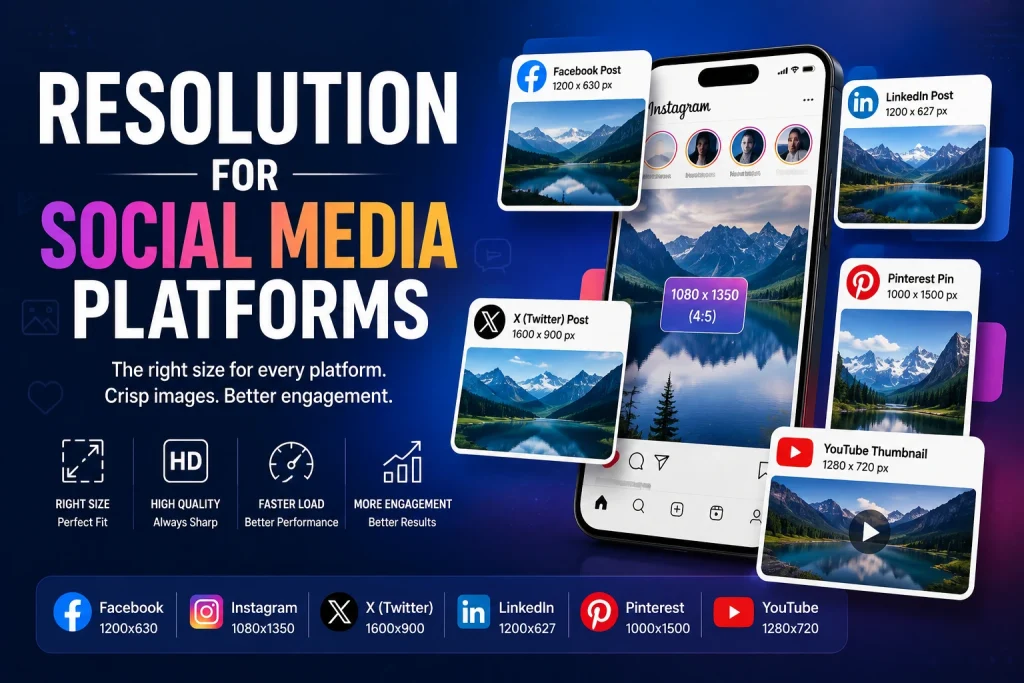
Social media platforms have specific resolution requirements. Uploading at the wrong resolution either wastes bandwidth (too large) or results in blurry images after platform recompression (too small).
| Platform | Image Type | Recommended Resolution |
|---|---|---|
| Feed post (square) | 1080 × 1080 px | |
| Feed post (portrait) | 1080 × 1350 px | |
| Stories / Reels | 1080 × 1920 px | |
| Feed image | 1200 × 630 px | |
| Cover photo | 820 × 312 px | |
| Twitter / X | Feed image | 1600 × 900 px |
| Post image | 1200 × 627 px | |
| YouTube | Thumbnail | 1280 × 720 px |
| Standard pin | 1000 × 1500 px | |
| TikTok | Video thumbnail | 1080 × 1920 px |
Platform recompression: Every social media platform recompresses images after upload. Instagram, Facebook, and Twitter all apply their own compression algorithms — which can reduce visual quality, especially for images uploaded at the wrong resolution. Uploading at the exact recommended resolution gives the platform’s algorithm less reason to aggressively recompress. Our article on how to optimise images for SEO covers platform-specific image optimisation in detail.
Resolution and File Size — The Direct Relationship
Resolution and file size are directly connected — more pixels means more data to store, which means larger files. Doubling the pixel dimensions of an image (in both dimensions) quadruples the file size — because four times as many pixels need to be stored.
| Pixel Dimensions | Total Pixels | Approximate JPG Size |
|---|---|---|
| 400 × 300 | 120,000 | 20–40 KB |
| 800 × 600 | 480,000 | 80–150 KB |
| 1200 × 900 | 1,080,000 | 180–350 KB |
| 1920 × 1080 | 2,073,600 | 350–600 KB |
| 2560 × 1440 | 3,686,400 | 600 KB–1 MB |
| 4000 × 3000 | 12,000,000 | 1.5–4 MB |
This relationship is why using the correct resolution for each use case matters so much for website performance. A 4000 × 3000 pixel image displayed at 800 × 600 pixels on a website loads 25 times more pixel data than necessary — slowing the page dramatically with no visual benefit.
Always match image resolution to the display context. Resize images to the correct pixel dimensions before uploading — then compress to reduce file size further. Using our Image Compressor after resizing gives you the smallest possible file at the best quality for each specific use case.
How to Check the Resolution of an Image
On Windows
- Right-click the image file
- Select Properties
- Click the Details tab
- Look for Image section — it shows width, height in pixels and the DPI value
On Mac
- Open the image in Preview
- Go to Tools > Show Inspector (Command + I)
- The Inspector panel shows pixel dimensions and DPI
Or use Finder: right-click the image, select Get Info — the image size section shows pixel dimensions.
In a Web Browser
- Right-click any image on a webpage
- Select Inspect Element (Chrome, Firefox, Edge)
- Look for the image tag in the HTML
- The
widthandheightattributes show display dimensions - For the intrinsic pixel dimensions, look at the element panel or hover over the image URL in the network tab
In Google PageSpeed Insights
Go to pagespeed.web.dev, enter your website URL, and run the test. Under “Properly size images,” Google will flag any images where the file dimensions are significantly larger than the displayed dimensions — and tell you exactly how many bytes could be saved by correcting the resolution.
How to Fix Resolution Problems
For Web Images — Resize to Display Dimensions
The solution for oversized web images is resizing to the correct pixel dimensions. Our free Image Resizer lets you enter exact target dimensions and download the correctly sized image instantly. Always maintain the aspect ratio when resizing — changing one dimension without proportionally adjusting the other distorts the image.
For Print Images — Ensure Sufficient Pixels
Use the formula — print size × DPI = required pixels — to check if your image has enough pixel data for the print size needed. If it doesn’t, source a higher-resolution version of the image. Scaling up a low-resolution image doesn’t add real detail — it just interpolates and creates a larger blurry image.
For Images That Are Too Low Resolution
If you have an image that’s too small for its intended use and no higher-resolution version exists, AI upscaling tools can help. These tools use machine learning to intelligently increase pixel count by predicting what additional detail would look like. The results are significantly better than traditional interpolation — but AI upscaling still can’t add genuine detail that was never captured. Results vary considerably depending on the image type and degree of upscaling needed.
Common Resolution Myths — Debunked
Myth 1: “72 DPI is for web, 300 DPI is for print.”
Partially correct — but widely misunderstood. 300 DPI is essential for print. 72 DPI for web is a legacy guideline that’s technically irrelevant for modern screens — the DPI metadata value in an image file has zero effect on how it displays in a browser. What matters for web is pixel dimensions, not DPI.
Myth 2: “Higher resolution always means better quality.”
Not always. Higher resolution than the display or print output can show creates unnecessarily large files with no visible quality benefit. A 12-megapixel image displayed on a 2-megapixel screen uses 10 million unnecessary pixels. Match resolution to output — more is not always better.
Myth 3: “You can improve image quality by increasing DPI in Photoshop.”
Changing the DPI value in Photoshop’s Image Size dialog without resampling doesn’t add any pixel data — it just changes the metadata that tells print software how large to print the image. The actual image data is unchanged. Increasing DPI while resampling does add pixels through interpolation — but this invents pixels rather than capturing real detail, and the result looks softer than a genuinely high-resolution image.
Myth 4: “A photo that looks good on my phone will look good printed large.”
Not necessarily. Phone screens are small and high-PPI — they display images sharply at lower pixel counts. A 800 × 600 pixel image might fill a phone screen and look great. Print that at 8 × 10 inches at 300 DPI and it’s only 2.7 × 2 inches of sharp content — the rest is pixelated.
Frequently Asked Questions
1. What is image resolution in simple terms?
Image resolution is how much detail an image contains. For screens, it’s measured in pixel dimensions — how many pixels wide and tall the image is. For print, it’s measured in DPI — how many pixels or ink dots fit in each inch. Higher resolution means more detail and the ability to display or print at larger sizes without looking blurry.
2. What is the difference between DPI and PPI?
PPI (pixels per inch) is a screen measurement — how many pixels are packed into each inch of a display. DPI (dots per inch) is a print measurement — how many ink dots a printer places in each inch. In everyday use, the terms are often used interchangeably. For web images, DPI/PPI doesn’t affect display quality — only pixel dimensions matter. For print, 300 DPI is the standard for professional quality.
3. What resolution do I need for printing?
300 DPI is the professional standard for print quality. Multiply your print size in inches by 300 to get the minimum pixel dimensions — a 5 × 7 inch print needs at least 1500 × 2100 pixels. For large format prints viewed from a distance, 150 DPI is often acceptable. For billboards viewed from 20+ metres, 25 to 72 DPI produces acceptable results.
4. Does resolution affect file size?
Yes — directly. More pixels means more data to store, which means larger files. Doubling both dimensions of an image quadruples the file size. A 400 × 300 pixel image might be 30KB as JPG. A 1600 × 1200 pixel image (4× the dimensions) of the same scene would be approximately 480KB — 16 times the data.
5. Why do my images look blurry when I print them?
The most common cause is insufficient resolution for the print size. Check your pixel dimensions against the required resolution — for a print at 300 DPI, multiply the print size in inches by 300 to get the minimum pixels needed. A 600 × 400 pixel image printed at 8 × 5 inches only achieves 75 DPI — well below the 300 DPI needed for a sharp print.
6. What resolution should website images be?
For screen display, focus on pixel dimensions not DPI. Match the image pixel dimensions to how large the image displays on the website. A 1920 × 1080 pixel image for a full-width banner. A 1200 × 628 pixel image for blog featured images. An 800 × 800 pixel image for product images. The DPI value stored in the file metadata has no effect on how images display in browsers.
7. Can I increase image resolution to fix a blurry image?
Traditional upscaling — simply adding pixels through interpolation — makes the file larger but the image doesn’t look sharper. AI upscaling tools do a much better job by predicting what additional detail should look like — but they still cannot recover detail that was never captured. The best fix for a low-resolution image is sourcing a higher-resolution original.
8. What is 4K resolution?
4K resolution refers to displays and content with approximately 4000 pixels of horizontal resolution. The standard 4K (UHD) resolution is 3840 × 2160 pixels — exactly 4 times the pixel count of 1920 × 1080 (1080p). Images displayed on 4K screens benefit from higher pixel dimensions to take advantage of the display’s increased pixel density.
9. What resolution do I need for Instagram?
Instagram recommends 1080 × 1080 pixels for square posts, 1080 × 1350 pixels for portrait posts, and 1080 × 1920 pixels for Stories and Reels. Instagram recompresses all uploaded images — uploading at these exact recommended dimensions gives the platform’s algorithm the best possible source material and minimises visible quality loss after recompression.
10. Does image format affect resolution?
Not directly. Resolution is about pixel count and DPI — independent of format. A 1200 × 800 pixel image contains the same resolution whether saved as JPG, PNG, or WebP. Format affects file size and compression quality, not the fundamental resolution of the image. The exception is SVG — which has no fixed resolution because it’s vector-based and scales to any size perfectly.
Conclusion
Resolution is one of the key concepts in digital imaging that can be misunderstood easily. This concept becomes clear if you separate screen resolution from print resolution.
In case of screens: pixel dimensions should be taken into account. Adjust the dimensions of your image to the dimensions of the screen. The DPI data included in the file does not have an effect on the way it appears on a screen. A 1920 × 1080 image will cover a 1920 × 1080 screen entirely regardless of whether its DPI is 72 or 300.
In case of prints: DPI determines the quality of an image. The professional norm is 300 DPI. The required pixel dimensions can be calculated by multiplying the print size in inches by DPI. Thus, a 5 × 7 inch print in 300 DPI requires at least 1500 × 2100 pixels.
For web performance: more pixels than needed means larger files and slower loading. Always resize images to the correct pixel dimensions for their display context before uploading. Our free Image Resizer makes this quick and precise — enter your target dimensions and download a correctly sized image in seconds.
Understanding resolution removes the guesswork from every image decision — whether you’re preparing photos for print, optimising images for a website, or troubleshooting why your images look blurry in different contexts.